
Let your AI run your Instagram.
Connect PlanReply to Claude, ChatGPT or Cursor and just ask. Your AI can schedule Reels, create and launch automations and read your stats. You decide what it may do, and you can disconnect it any time.
AI connections are part of PlanReply Pro, from $19/mo. See plans
What is MCP, in plain words?
MCP (Model Context Protocol) is an open standard that lets AI apps use other tools for you. Think of it as a plug: you plug PlanReply into your AI app once, log in to PlanReply, and approve what the AI is allowed to do.
After that you can talk to your AI like you would talk to an assistant who knows your Instagram: "post these on my best slots", "make a GUIDE automation", "what worked this month?". The AI uses PlanReply to do it, and you see every change in PlanReply too.
What your AI can do with PlanReply
When you connect, PlanReply shows a consent screen with three permissions. Reading is always on, because every task needs context. The other two are your choice.
Your workspace and brand profile, Instagram accounts, Reels analytics, automation funnels, scheduled posts, free time slots, contacts and activity.
Upload videos, schedule Reels on free slots, and move or delete scheduled posts.
Create automations from the 6 templates, change messages and keywords, launch, pause or delete them.
See your Instagram password or Meta tokens, change your PlanReply password, or touch billing.
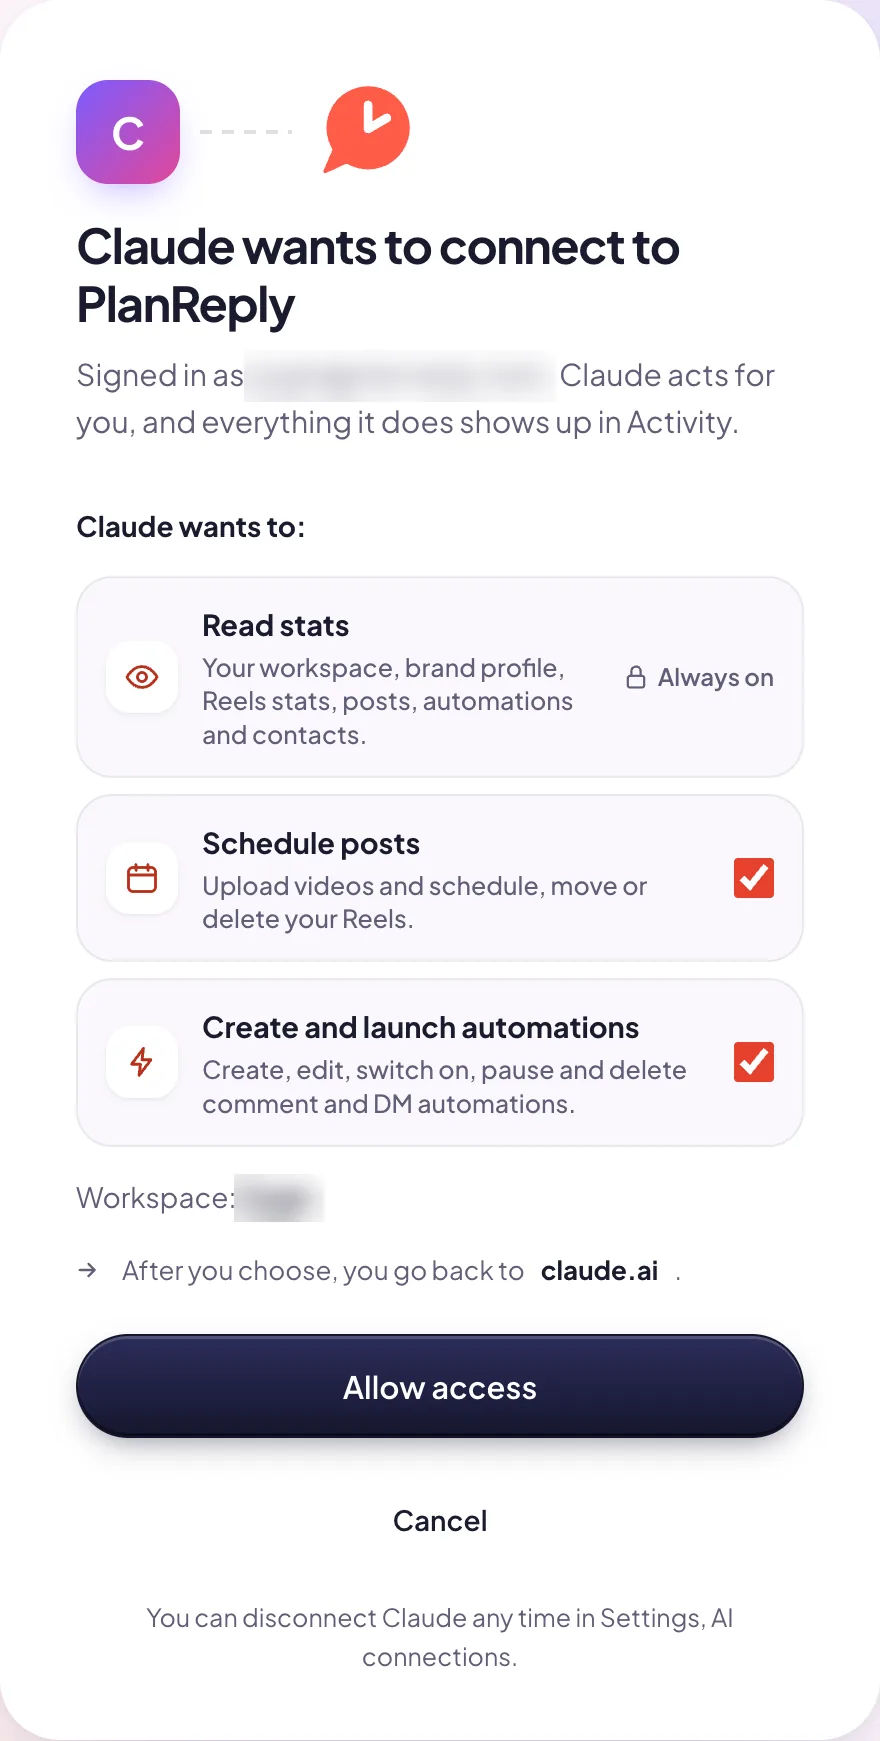
The consent screen you see when you connect an AI app.
How to connect
Before you start: your PlanReply workspace needs a Pro plan (any Pro plan, from $19/mo). On Free, the consent screen offers an upgrade instead. See plans.
The PlanReply MCP server address is:
https://api.planreply.com/mcp- In claude.ai, open Settings → Connectors and click Add custom connector.
- Name: PlanReply. URL: https://api.planreply.com/mcp. Leave the advanced OAuth client fields empty.
- Click Add, then Connect. Log in to PlanReply, pick your Pro workspace, untick anything you do not want and press Allow access.
- In a chat, switch PlanReply on in the tools menu. The connector also syncs to Claude Desktop and the Claude phone app.
Team and Enterprise: an owner adds the connector once in the organization's connector settings, then each person connects their own PlanReply account.
Already added PlanReply on claude.ai? It syncs to Claude Desktop automatically. Otherwise:
- In Claude Desktop, open Settings → Connectors and click Add custom connector.
- Name: PlanReply. URL: https://api.planreply.com/mcp. Leave the advanced OAuth client fields empty.
- Click Add, then Connect. Log in to PlanReply, pick your Pro workspace and press Allow access.
- In a chat, switch PlanReply on in the tools menu.
Sign in with your browser (recommended). Run this once in your terminal:
claude mcp add --transport http planreply https://api.planreply.com/mcpThen inside Claude Code type /mcp, choose planreply and Authenticate. Log in to PlanReply in your browser and press Allow access.
Or use a personal access token. In PlanReply open Settings → AI connections, click Create token (it is shown once) and run:
claude mcp add --transport http planreply https://api.planreply.com/mcp --header "Authorization: Bearer YOUR_TOKEN"Check it with claude mcp list (planreply shows as Connected). Remove it with claude mcp remove planreply.
- In ChatGPT, open Settings → Apps & Connectors → Advanced settings and turn on Developer mode (Plus, Pro, Business, Enterprise and Edu plans).
- In Apps & Connectors, click Create.
- Name: PlanReply. MCP server URL: https://api.planreply.com/mcp. Authentication: OAuth. Confirm you trust the app and click Create.
- Log in to PlanReply and press Allow access. In a chat, open the + menu, then Developer mode, and pick PlanReply.
Add this to ~/.cursor/mcp.json (or use Settings → MCP → Add new MCP server):
{ "mcpServers": { "planreply": { "url": "https://api.planreply.com/mcp" } } }Then click Connect next to PlanReply, log in to PlanReply in your browser and press Allow access.
Prefer a token? Create one in PlanReply under Settings → AI connections and add "headers": { "Authorization": "Bearer YOUR_TOKEN" } next to url.
Other apps (VS Code, Windsurf, Gemini CLI, n8n and any client with remote MCP support): give it the URL above. Apps that sign in with OAuth find everything on their own. Apps that only take a header use a personal access token.
Tokens and connections live in PlanReply under Settings → AI connections. Create a token there (it is shown once), see every connected app and what it may do, and revoke any of them any time.
Menu names in AI apps change from time to time. If a step looks different, look for "connectors", "integrations" or "MCP servers" in the app's settings.
Things to ask
- "Schedule these 5 Reels for next week at my best times."
- "Make a comment to DM automation: keyword GUIDE, send my Notion planner, ask for an email first, then launch it."
- "Which Reel brought the most emails this month, and what do the top 3 have in common?"
- "Pause the GIVEAWAY automation and move tomorrow's Reel to Friday 18:00."
- "How many contacts have I used this month, and when will I hit my limit?"
- "Write a welcome message in my brand voice and turn it on."
Safety first
- You approve the access. The consent screen shows exactly what the AI app asks for. Publishing and automations are separate switches.
- Confirmations for big actions. Actions that change things, like launching an automation or deleting a post, are marked so your AI app asks you before it goes ahead.
- Plan changes are safe. If a workspace moves back to Free, its AI connections pause with a clear message and start working again after an upgrade.
- Revoke any time. Disconnect an AI app or token in PlanReply under Settings → AI connections and its access stops right away. You can also remove the connector in the AI app.
- Same rules as you. Everything goes through the same PlanReply limits and Meta rules as the dashboard: 24 hour window, STOP, rate limits and your contact limit.
- No passwords shared. Your AI never sees your Instagram password or Meta tokens. It gets a PlanReply access token that you can revoke.
Set up Instagram, upgrade to Pro, then connect your AI in a few minutes. Questions? labas@urbietis.lt